“Three Fall craft ideas inspired by my trip to the farmers market” as featured on The Painted Hinge on the Farmhouse Friday Night Link Party #79.
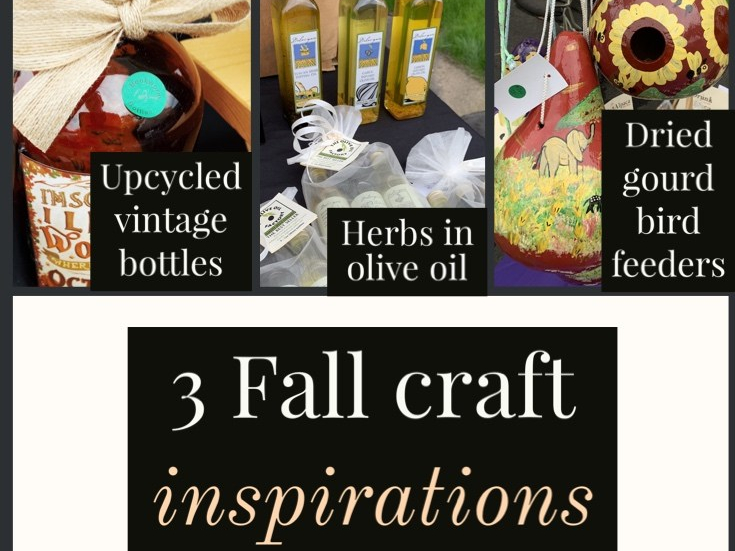
3 Fall Craft Ideas
Food is not the only thing you’ll find at a farmers market. You can get do-it-yourself Fall craft ideas there, too! Not too crafty? No problem, you can still pick up a pumpkin or two or 10 to carve or paint.
Here are three craft inspirations I found during a walk through an Autumn farmers market. Several of these were also featured in a recent farmstand5, a series on my Top 5 picks from local farm stands.
#1
Vintage bottles repurposed

A young woman creates these upcycled Bookworm Bottles for her mother’s corner gift shop, and you can visit her site to pick one up. But if you happen to have any old bottles at your house or in an antique shop near you, be inspired to create your own!
I’m seeing a lot of bottles used to decorate farmhouse shelves, dining room sideboards and glass door hutches. These will add a little interest and personality to otherwise minimalist decor.

How to repurpose vintage bottles:
Need:
Computer, printer, paper OR stickers to use as labels
Super glue, glue gun or rubber glue
Burlap or fabric swatches
Ribbon, broken necklaces/bracelets, or jute string
Cork stoppers or old wine bottle corks for tops
Print out colorful labels and glue or rubber glue them to your bottles. They look beautiful layered on top of burlap or fabric swatches. You can glue a jute string or cut ribbon around them as a border. To finish them off, tie a ribbon, string or upcycle a broken piece of costume jewelry by wrapping it around the neck of the bottle. Don’t forget to order some corks or reuse a wine bottle cork for the topper. You may have to cut the corks a little to get the best fit. Try to cut them on a taper or just two-thirds of the way to the top so most of your adjustments are hidden below the mouth of the bottle.
#2
Infused olive oil in a glass bottle

Get ready for the season of dinner parties, cookie swaps and holiday festivities with your own do-it-yourself flavored cooking oils. I use these oils to decorate the mantel above my range and window shelves in my farmhouse kitchen. You could even line them up on the tops of your cabinets or hutches. They are so pretty, like food art. My favorite oil is full of dried chilies and one sprig of rosemary. It is delicious with bread, for sauteing chicken or veggies and on pizza. Yep, it’s tres-francais to add flavored (usually spicy) oil to pizza.

How to infuse olive oil:
Need:
Clear glass oil bottle
Your favorite olive oil (inexpensive oil is better)
Dried herbs, dried peppers, dried hot chilies, whole peppercorns, fresh or dried garlic
Suggested herbs: bay leaf, rosemary, sage, lavender
As an Amazon Associate, I earn from qualifying purchases.
First, make sure everything is clean and dry – the bottle, the lid, the herbs, everything. Water droplets could spoil your oils. Put any mix of the dried herbs, peppers, garlic or peppercorns into the empty glass bottle. Pour in the olive oil. A funnel would be helpful if you have one to avoid spillage.
Online you can find lots of different recipes for olive oil infusions. Some of them require sauteing the ingredients in a pan. For gifts or making bottles that decorate your kitchen shelves, I don’t recommend the cooked infusions over just using herbs or peppers that were already dried out and preserved. Olive oil infusions you have to cook are quick and easy, but they don’t last as long as just letting dried herbs, spices or peppers slowly infuse into the oils over a week.
#3
Handpainted, dried gourd birdhouses

A display of handpainted gourds is both seasonal and inspiring at this farmers market stand. It reminds you not to neglect the outdoors while you are decorating indoors! Think about the feeling you would have every time you glanced out of your kitchen window and saw a handcrafted birdhouse in your tree. It will be exciting to see sweet little birds enjoying your hard work as the seasons change.
There are a lot of articles online about how to dry your own gourds for crafting. If you do that, you are our hero! It takes four-to-ten months though…oh, um, no. To get this Fall craft idea going before next Fall, you should probably just have one shipped to your house in two days.
How to make handpainted gourd birdhouses:
Need:
Large dried gourd with a hole drilled in the side…
OR gourd seeds, 10 months of waiting, and a hand-cranked screw for drilling
A pencil
Acrylic paint brushes set
Acrylic paint set (this one
is under $10!)
Acrylic prep primer and paint sealer
(look for fast-drying sealer)
Newpaper or an old blanket, towel or trap to minimize messes
You can use the Amazon links here to buy anything you need. Brick and mortar craft stores will also have the full rainbow of acrylic paints and brushes.
There is actually an American Gourd Society, and they have gourd-painting experts on hand to offer tips on how to template something fancy for your gourd. It sounds like I’m being sarcastic, but I’m not. Here’s the link.
The templates can be pretty intricate. I think you’re better off just priming the gourd, lightly penciling in a simple design or pattern, painting it
and sealing it
after the paint dries completely.
I would look for inspiration from blouses, plaid shirts, wallpaper and Pintrest patterns. The Pintrest patterns are great. I shouldn’t even have put that link in here because now you will likely forget about reading my next article and get lost in a world of patterned excess.
Come back and visit farmstand culture soon!